Subscribe Here RSS or Email

12/21/08

Vector Graphic, Image Manipulation Free Download Software

1 Comment Buzz Here
Have you ever thought of designing your own header template and your not sure if you can?

I designed a few and it turned out great (That's for me, anyway) the very first that i made that i like so much is my other site's header clickdtalk then next is my hubby's site IMW ever since he started i designed, re-designed he's site and header. I really love playing with images and making my own headers.

I have downloaded and use a few graphic editor software, an image manipulation etc..., and i would like to share them to you this are a Free to download software and also a very easy to use.

Serif Draw Plus 4.0 - Vector Graphics, Illustration and Drawing; This is my one of my favorite...you can create a vector image and even an animation, you can convert the image and edit them so easy to learn and you are going to enjoy using this software.

Gimp - This is another Popular image manipulator, you can find a lot of tutorial that can help you with this software. Honestly, i downloaded this but have not tried it yet, i read a lot of tutorial and the reputation is quite high so it's all up to you but for me it's worth trying...i am definitely will try to learn how to use Gimp.

Inkscape - An Open Source vector graphics editor, If you can't afford Illustrator, CorelDraw, or Xara X, using the W3C standard Scalable Vector Graphics (SVG) file format then inkscape is the answer it's capabilities is similar to the above mentioned. I love this and i am studying on how to trace my own image.

Show you one that is done 100% by inkscape by one of artistic user ScislaC
How do you like that!....

Anyway, this are the three that i know except Adobe because for me this is for professional users you have to pay i love to have one but i am a basic user so i am happy with what i have. Now that you have this choices of image editor software (Actually more then editor) you can start playing with your images and make your own site header.

Please let me know which one you choose and enjoy to use among the three, i would love to hear them.

12/17/08

Who said Man

3 comments Buzz Here


Ican't help but to post this one...some might have seen this already but to those who have not seen it yet, Enjoy!


So, Girls -- what do you think?

12/12/08

Blogger Smilies

2 comments Buzz Here


How do you like to have Smilies on your blog? Some blogger have already use smilies and some are not because either you have not aware that you can use them and not just yahoo messenger or you don't know how to.

I know that you can use smilies :) but have not used them for quite a while until now that i remembered. Geekaholic have the full instruction but i decided to share it here aswell but it is more of short cut, i suggest to read more from he's blog to learn and understand more about smilies.

Here's what to do:
Go to your Dashboard - Layout - Edit HTML then Hit Ctrl+F type </head> and place the code below before closing the head.

<script src='http://aditya.vm.googlepages.com/addSmiley.js' type='text/javascript'></script>


then save.

That's it...Easy.

12/10/08

Position Comment Date Above the Comment Body

0 comments Buzz Here
I am so glad that blogger have finally release the new comment system and now we can start making it look better like wordpress comment system or any other platform. :-)

I have posted about how to improve your comment section to create more interaction and that include how to highlight the authors comment. I have seen now a few sites where there comment section looks great and look much more better than before.

Today let's make a little changes, if you have noticed the timestamp in your comment section is placed at the bottom of the body...i would rather place them at the top right next to the comments authors name. To make this possible we will move the timestamp code right next to the comment authors code. Here's how to do it:

Reminder: Before editing your template, make sure to save a copy of your template.

Let's start:

  1. Go to your Dashboard - Layout - Edit Html
  2. Tick the box to
  3. Click Ctrl+F then type <dd class='comment-footer'>,will then get to the code below
  4. This code below is what we need which you can find right after <dd class='comment-footer'>

  5. <span class='comment-timestamp'>
    <a expr:href='data:comment.url' title='comment permalink'>
    <data:comment.timestamp/>
    </a>
    <b:include data='comment' name='commentDeleteIcon'/>
    </span>
  6. We will move the above code right after <data:commentPostedByMsg/> then save.
Now look at what you have just done....it looks better than having the timestamps at the bottom of the comment body right!?

I hope you enjoy this tutorial as much as i am...until next time.

11/30/08

How To Add ScrollBar To The Sidebar

7 comments Buzz Here
I find this very useful to those Bloggers who would prefer to put their list of link in the sidebar. For bloggers even though blogspot have no potential of adding another page with the help of talented bloggers we can now do it, please read my post How not to show Post Date When You Make Your ABout Me Page -- this is if you want to ad your link in your navigation page but for those who want the list to be seen in their sidebar then here's my tut's for you.

Entrecard is very Popular of connecting each blogger and now each blogger created a great list of friends, drop list and so on...

Here is how to add a scroll bar to save some space of your sidebar.

  • Go to your Dashboard, Layout, Edit HTML.

Reminder before we start: Always download your template for safety reason.

  • Type Ctrl+F type sidebar content
  • Copy this code below right after the /* Sidebar Content */
/* Sidebar Content */
#LinkList1{
height:200px;
overflow:auto;
}

then save.

That LinkList1 (Color Blue) Replace them with the title you name of your list example: when you add the widget you title them as "Drop List" then that's the word you replace -- but to make it safe and to save more time of errors here's what to do.
  • Edit HTML - tick the Expand Widget Templates
  • Ctrl+F type <div id='sidebar-wrapper'>
<div id='sidebar-wrapper'>
<b:section class='sidebar' id='sidebar' preferred='yes'>
<b:widget id='Subscribe1' locked='false' title='Subscribe To' type='Subscribe'/>
<b:widget id='LinkList1' locked='false' title='' type='LinkList'/>
</b:section>
</div>
In my sidebar-wrapper it shows that the id in that sidebar are Subscribe1 and LinkList1 -- Linklist is what i named my list so i copy the "LinkList1" (Blue) then paste it to my sidebar content, you can change the height according to your liking.

This scrollbar toturial is only apply if you want to put scrollbar to only one widget, if you want more than one widget or the whole sidebar of even within your post then we added another code but that's for now i hope this helps and find it useful.

11/17/08

Subscribe to: Posts (Atom) Hide it or Replace them to RSS, Here's How

1 Comment Buzz Here
Some blogger want to remove the Subscribe to: Posts (Atom) but for some they just replace the Atom to RSS. I will share to you how to remove it, if that's what you want and also will show you how to replace to RSS instead.


Here at TBN i decided to replace Subscribe to: Posts (Atom) to Subscribe to: Posts (RSS) -- scroll down and you will see the demo.

Here is the easy way to actually hide it


Go to your Dashboard - Layout - Edit HTML
Hit Ctrl+F type .feed-links { (You will then directly see the CSS Code)
Add this Code
display:none;

This is what the whole Feed-link CSS code should look like

.feed-links {
display:none;
clear: both;
line-height: 2.5em;
}

Then save your template and it should be hiding now.

Replace the Atom to RSS

Save your template to make sure that when you make mistake you can still go back to your old settings.

Go to your Dashboard - Layout - Edit HTML
Click Expand Widget Template
Ctrl+F find this code
<a class='feed-link' expr:href='data:f.url' expr:type='data:f.mimeType' target='_blank'><data:f.name/> (<data:f.feedType/>)</a>

When you get to this code replace them Atom code to RSS code below, preview first and if happy then save it.
<a class='feed-link' expr:href='data:f.url + "?alt=rss"' type='application/rss+xml' target='_blank'><data:f.name/> (RSS)</a>

You should have RSS now instead of Atom or have hid them, if that's what you have choosed.

Credit

Replace Atom to RSS is based to PurpleMoggy's Blog.

11/16/08

Blog Pictures

2 comments Buzz Here

We all know photo's attracts visitors attention and it's a known and tried facts. were did you get your images? are you sure it's properly licensed and copyrighted?

I got my blog pictures at Acobox collects, screens, and hosts quality pictures for bloggers. All images are properly licensed, optimized, and ready use with blogs. For adding a picture to blog post, what blogger needs to do is simply copying and pasting a piece of image code, without downloading, resizing, uploading the image file. It's simple, easy, and free!

Blog Pictures | acobox.com

Here are few reasons why using acobox.com

  • You don't have to search the whole web for images that are good with blog posts because we do it for you.
  • You don't have to worry about copyright and license because we guarantee all images are properly licensed. Everything will be OK as long as you follow acobox Terms of Use.
  • You don't have to download the image because acobox hosts it.
  • You don't have to optimize the image for web because we have done it.
  • You don't have to resize the image because you can choose a size that is best for your page from 5 sizes for each image.
  • You don't have to maintain an image library because we maintain one, larger and better.
  • Last, but not the least - it's free!

CSS Sites to Visit

3 comments Buzz Here
If you are thinking of learning or even want to understand CSS i have listed a list of sites i love to read and visit every now and then. You will find a very helpful tutorials.
In no particular order here they are:
  1. W3Schools - Here's where i started learning and understanding the CSS, HTML and all the technical word and tutorials. Still a use for some of Successful Website designers.
  2. 456 Berea Street - Demo of one of Roger Johansson tutorial. You can find a lot of useful tutorial easy and help you understand CSS.
  3. Smashing Magazines - Not just Freebies, Graphics, showcases but tutorials and CSS can be found her. I love reading this site so much to learn, actually so much to get.
  4. Web designer Wall - Love the design of the site, but i love the tutorials aswell. You will not get bored in this site.
  5. Eric Meyer - Try this one, simple explanation and easy to follow tutorials.
  6. CSS Discuss Wiki - Discussions about CSS, techniques for page-layout and more...
  7. Stop Design - this is a creative outlet of Douglas Bowman.
  8. CSS beauty - News, Job, Community, Tutorials and books and more there so much to learn about CSS here.
  9. CSS Tutorial- This is full of tutorials that are easy and really good place to begin with.
  10. Echoecho - I like this site, you can follow the tutorials.
I hope you find this all useful, even though you think you don;t have the skills but when you blog, it is important to understand them aswell. To those bloggers who love to tweak and play with thier templates i am sure you will enjoy visiting this sites.

11/11/08

Ways to improve your blog

5 comments Buzz Here
When i started blogging i don't have any idea about html, javascript etc.. all those terms freak me out, im not technical type of person but i think the best attitude that i have is never to give up and never say never, i keep trying and reading, anyway...if you want to make money online blogging all you need to do first is to improve your blog. I will be listing here ways for you to improve your blog.

Ways to Improve your blog.
  1. Headers Pictures - If you have notices pictures can describe a thousand words. Put some relevant pictures on your blog header and in your post make sure that the picture on your header describe your site because it is your identity, as well the picture in your post are related to your post. This is the great way to direct the attention of your readers to your theme and to your post. One that i used is Picnik to tweak and twist & work on photo's this is very useful tool for your blog.
  2. Clear Contents and Fonts - Make sure that you have clear content and fonts are readable, you have different kinds of readers and you want to make everyone happy. Make your readers comfortable reading with your content or elase you are losing the chance of your reader to subscribe or coming back to your blog.
  3. Subscription and RSS - To encourage your readers to subscribe to your blog make sure that they can easily access to your subscription form and rss and if it is possible to use unique RSS Icon to stand out.
  4. CPC Ads - Do not make the CPC Ads obvious if you can make private ads that's much more better because in most cases people are annoyed, try to experiment, twist, tweak and have fun with your blog.
There are still many ways for your to improve your blog...all you need to do is not to stop reading, studying and trying everything but make sure if you are making changes using the html download the templates to your computer first to be safe.

Learning is fun, improvement is more fun but the best fun of all is when your have mastered the way of monetizing your blog...have fun blogging.

11/6/08

Use Adsense For Search in your site

2 comments Buzz Here

Let's make the most of adsense. I have been using Adsense since i started blogging but never get any chance to see the full use of Adsense. We all know that putting adsense ads on our blog is way of making money but for most we never use or get notice the Adsense for Search this is another way of making money using adsense. Lets make the most of Adsense.


Today i will show you how to put it in your blog using as your search page. Most of our readers or visitors navigate our sites and look for more or our content they use site search, why not use Adsense and make money at the same time. Here's how to do it.

Adsense For Search

  1. Open your Adsense Account, if you don't have one you can Register it's Free.
  2. Once your in go to Adsense Set-up then choose Adsense for Search follow the instruction. 
  3. You will given a choices look at the image below --  this is what i have done with mine


  4. When you get this "Opening of search results page
    Choose whether you would like your search results to open on Google or within your site" What i did is that i made a new page for search result then put the link there. if you just want it within your site just put your site URL.
  5. Submit and Get Code, you will be given two set of codes ... first code is your form and second code is the result page. 


Place the Search Form and Page Result in your Site

  1. Copy the first Code then Go to your Dashboard - Layout - Page Elements then add a gadget scroll down until you get to HTML/Javascript then paste the first code there.
  2. then Save.
For the Page Result: This is the Option if you don't want it to open in a separate page
  1. Edit HTML - Save your template for safety (Do not click Expand Widget Template)
  2. Ctrl+F <div id='main-wrapper'> then paste the Search Results Code below (Just after) main wrapper then save.

Want the Result in a New Page

  1. Create a new Post
  2. Paste the Search Results Code then ... scroll down then click Post Options; Back Date (You can read my post about How not to Show Your Post Date When you make your about me page)
  3. When your done, save then go to your dashboard and look at the URL of the post that you just made then Edit the setting of your Adsense for Search.
  4. When you get this "Opening of search results page
    Choose whether you would like your search results to open on Google or within your site" then tick


    http://www.yoursiteurl/search-result.html Enter URL where search results will be displayed 
Important: If you make changes with your setting, make sure you change the Form box code aswell as the Search Result Code.

I hope you find it easy to understand, additional income is sweet using adsense search.

11/3/08

Feel like you want to create a new logo or just want to doodle?

1 Comment Buzz Here

This is just a quick post. I have doodling and my mind is not really in good condition to make proper post, but i decided to share you some sites where you can play around for your Logo or header.


Most of the Blogger really settled already for their site logo or header but some are still looking for great resource and at the same time easy to use too!..


That word should be "This is my very first ART, Not Bad" but hey i didn't notice it, sorry about that.


The links that i will share are the sites that you can use in quickie way. You can play around and once you are happy then that is the time you save them and use them as you logo or header.

  1. Acme Label Maker - Just type the text and click then you will see the result, very quick.

  2. Scribbler - Scribble any text you want, or do some doodling then click done drawing from there do some setting and you good to go...it's fun.

  3. 3dtextmaker - I love this one, you have a great control and a lot of text design to choose from.

  4. image Reflection Generator - This is when your done and you want more -- then put some reflection. I have seen a lot of bloggers using reflection in their text logo, try it you might like it. You can even use it for images.

  5. Picassohead - I am having fun with this one, make a head in a very artistic way.

There so much more but i need to find them, i am sure they are just there somewhere buried in my bookmarked sites, they are too many and i need to do some cleaning in my bookmarks including my toolbar Folders.


I hope you find this useful and if you have additional which am sure you have some resources aswell, please do share them.

10/29/08

Placing Ribbon Rules

2 comments Buzz Here
One of my favorite veerle's blog have this really cool site design and one that i like is the ribbon. I found this generator from Dynamic Drive Tools to make it more easier for you to generate a horizontal alternating colors or as it calls "Ribbon Rules".
What i like with this generator is that it gives you an option to use a random colors only choosing a one color as your base or to individually select colors that you like using color picker or if you already knew the hex color code you can just place it on each section hit generate if not happy try again or reset until your satisfied, how hard can it be?

You are also given a CSS code to use, so for newbie or those who are not familiar with coding it easy as ABC.

But...here's what to do if you want to use ribbon rules with blogger.
  1. Go to Dynamic Drive Tools Ribbon Rules Generator to generate your ribbon.
  2. Follow the instruction and upload them to Photobucket, Google Pages or any of your image hosts.
  3. Go to your Blogger Dashboard - Layout - Edit HTML
  4. In your Keyboard Hit Ctrl+F then type body { (If it won't work just look for this Code manually)
  5. Then Add the CSS Code given; This is what the code look like once your done.


background:#1f2a22 url(ribbon.gif) top left repeat-x;
margin:0;
padding-top: 10px;


You can always change the hex color code to anything background color you want. This is simple yet make your site look neat and stylish. I hope you like it and have fun with colors.

10/24/08

Build Your Pepperjam Store Builder Now!

4 comments Buzz Here
Have you joined Pepperjam yet?. Not like Adsense, pepperjam won't limit the ads you can place on your site. I noticed that most of bloggers like to have full control over their blog, that is why you hosted your own site, you buy your own domain etc...that's the same with Pepperjam you have all the control.

Pepperjam Store Builder allows you to build product store front very quickly and so easy. Here are things you do to build your virtual store, just to give you an idea aside from the self explanatory images (Click the image for a bigger preview) ; You select the products you want, choose a category then you can refine the result further by filtering the keywords. You can also customize to match with your site or to make it look more outstanding to get more attention it's all depend with your strategy -- when done, code the code then your done, your store is up and running without any hassle.

Before, creating a store front needed some understanding of php or any coding etc...but with Pepperjam Store Builder you can create them so quick without needing any expertise.

There are so many products to choose from, you find a partner and in less than 30 seconds you have a fully functional product feed storefront. I have included an image so that you can see the what it look like when you start building your store front. What really good is that they provided a Live Demo to help you more and make it more quicker and easier for you to build your store.

If you have not joined yet, this is your chance -- nothing to lose but something to gain.

10/22/08

I can see you! Faces of your Commenter's can now be seen

11 comments Buzz Here

Okay, just ignore my Title i am not really great of making a capturing title but just in case you read this post because of the title then i can say that i got lucky haha...

With my previous post i showed you how to customize your comment system and who say's that it's only wordpress can have fancy comment system? With the help of some very talented programmers, bloggers and hackers(Not the bad hackers i am talking here but those who play with codes and hacks) all of this makes possible. Now you can see your commenters avatar, how? i will explain them shortly.

I got a comment from Gem say's
"I was also trying to see whether it is possible to use profiles instead of MyBloglog hack. As you see, those who left comments above do not have their own MyBloglog accounts.

I guess no one figured that out. I've been using Google for that hack, by the way."
Answer to that is it is possible and already been used by few bloggers. Scripted by Singpolyma based by the work of Johan Sundstrom Updated by PurpleMoggy Updated and Promoted by http://www.bloganol.com i don't have any contribution but to spread it :)

Here's how to do it:
Go to your Dashboard - Layout - Edit HTML (Important! Save your template)
Hit Ctrl+F type </head>
Above that code place this Script


<script src='http://bloganolutilities.googlepages.com/blogger_comment_photos.js' type='text/javascript'/>
<script type='text/javascript'>
//<![CDATA[
addLoadEvent(function(){showCommentPhotos('commentphoto','comment-author', 1);});
//]]>
</script>


... Then Save.

Next is to tick the Expand Widget Template and look for this code Ctrl+F type dl id='comments-block

Here's what it all look like...

<dl id="comments-block">
<b:loop values="data:post.comments" var="comment">
<dt class="comment-author" id=""comment-" + data:comment.id">
<a name=""comment-" + data:comment.id">
<b:if cond="data:comment.authorUrl">
</b:if></a><a href="data:comment.authorUrl" rel="nofollow"><data:comment.author></data:comment.author></a>
<b:else>
<data:comment.author>
</data:comment.author>
<data:commentpostedbymsg>

</data:commentpostedbymsg></b:else></dt><dd class="comment-body">
<b:if cond="data:comment.isDeleted">
<span class="deleted-comment"><data:comment.body></data:comment.body></span>
<b:else>
<p><data:comment.body></data:comment.body></p>
</b:else>

</b:if></dd><dd class="comment-footer">
<span class="comment-timestamp">
<a href="http://www.blogger.com/%22#comment-%22%20+%20data:comment.id" title="comment permalink">
<data:comment.timestamp>
</data:comment.timestamp></a>
<b:include data="comment" name="commentDeleteIcon">
</b:include></span>
</dd>
</b:loop>
</dl>


Select the whole block of code and then replace them with this code below:

<dl id='comments-block'>
<b:loop values='data:post.comments' var='comment'>
<dt class='comment-author' expr:id='"comment-" + data:comment.id'>
<a expr:name='"comment-" + data:comment.id'/>
<b:if cond='data:comment.authorUrl'>
<a expr:href='data:comment.authorUrl' rel='nofollow'><data:comment.author/></a>
<b:else/>
<data:comment.author/>
</b:if>
<data:commentPostedByMsg/>
</dt>
<dd class='comment-body'>
<div class='commentphoto' style='float:left;margin:5px;'/>
<b:if cond='data:comment.isDeleted'>
<span class='deleted-comment'><data:comment.body/></span>
<b:else/>
<p><data:comment.body/></p>
</b:if>
</dd>
<dd class='comment-footer'>
<span class='comment-timestamp'>
<a expr:href='"#comment-" + data:comment.id' title='comment permalink'>
<data:comment.timestamp/>
</a>
<b:include data='comment' name='commentDeleteIcon'/>
</span>
</dd>
<div style='clear:both;'/>
</b:loop>
</dl>


Then Preview -- If no red marks shows you have no problem then save. Check your comments and now shows the profile images of your commenters.

Credit


Credit have already placed above as part of my post. Post Source: Bloganol.com

10/21/08

How not to Show your Post Date when you make your About Me Page

9 comments Buzz Here
When we blog, we want our site to be accommodating as possible. We want to make sure that we provide what our readers want for them to keep coming back and one of that we need to place in our blog is contact page, although there are many ways to contact the site owner but we want it to be more easier and we don't want to waste time of our readers -- of course you need to place the about page aswell, we need to let our readers know who is behind the blog. What stopping of blogspot dot com user of doing this is the inability of creating a separate page like Wordpress does.

Fortunately, we have particular webmaster who managed to find ways to work around this problem so bloggers users can now enjoy and place a page they like, Technically Easy have a very clever way to create a page using your post, He explains how to create a static page without showing the post date,if you miss it you can follow the steps here.


Follow this easy steps:
  1. Create a normal post. Type the information you want to provide for your readers -- Use this for your about me page, contact page or any other pages you want to show.
  2. When your done, scroll down until you get to the "Post Options" click them and you will see the options.
  3. Under Reader Comments click Don't Allow.
  4. Under Backlinks click Don't Allow.Post date and time: I place mine on the day i started my blog.
  5. When you think everything are in order and your ready to publish then click publish.
Now that everything is ready and created, we will then follow this easy steps to prevent the post date from being displayed (Hide the post date of your page).
  1. Go to your Dashboard, then click the Layout.
  2. Click the Edit HTML to display the layout in HTML.
  3. Make sure you tick the box to Expand Widget Template, this will display the code of each widget.
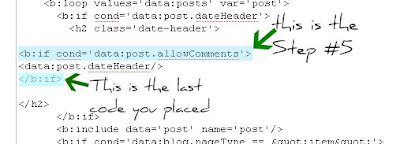
  4. We need to look for this code <data:post.dateHeader/> -- to make it easier for you find and save time hit Ctrl+F then place the code above.
  5. Before that line place this code:
<b:if cond='data:post.allowComments'>

To wrap it up and to finish this...again hit Ctrl+f and type this code:
<data:post.dateHeader/>


after that code or below the post date code, include this last code to close the html
</b:if>


and your done, save your template

This is how it going to look in your html.


This is to instruct blogger to only display the post date if comment are allowed. since you disable the comment in your about me page or whatever post you made earlier that won't display the date and you have now a nice and pages that won't display date more professional and well designed site page.

Now, if you don't know how to make your contact page and navigation button you might be interested to my post Steps on how to create your contact page and navigation button.

I hope you find this post useful and i would like to once again thanks Technically Easy for this tips and tricks i find it very useful for every blogspot users.

10/19/08

Slideshow using Wowzio

4 comments Buzz Here


How do you like slideshow? Do you have any hobby -- say sewing, designing, jewelry making, bedding or are you an artist and wants to show some of your work? Slideshow is most of the time saves space, time and also can capture a lot of attention of your visitors and readers. I have seen a lot of slideshows in fact i use one in the template that i just have done i use Jondesign's smooth gallery check it out too!


There is one that is easy to use which i have seen a few bloggers are using now and i see it really is great, i can see their older post and i click in them and link to each post aswell very neat it's so simple to use and i thought that i will post something about this because this is a widget that every blogger even those that are not familiar with CSS, Javascipt or any other code can use this, all you have to do is put your url or feeds then just follow the steps then done.

Wowzio is not just another widget, it is a widget that will help you engage more with your readers, simple, clean and no work in your side. just have fun and enjoy the slideshow. What they do after you put your blog url is that they will extract interesting images in your site and start from there.

Just try it and have fun with it, work with the customization, size and where to place them which ussually most of professional designer place the slideshow at the top where most people can see but it's all up to you, just have fun with it...there's so many widget to choose from depend with your need.

10/16/08

Wallpaper for Grab

7 comments Buzz Here


I just started learning Photoshop, I have them for quite a while but i just use them for some thing but today i want to make my own wallpaper and i like the result. I follow some steps of tutorial and add a few details in it.


I would like to share this, if you are interested you can grab them for free, Just click and save image as then load.

below are the two that i learned today.

.... here is the other one


Please let me know of what you think.. leave a comment aswell if you grab it for your desktop.

10/15/08

Just Random Rambling...

2 comments Buzz Here


I have been so busy lately. My hubby is away for 2 weeks and only me and the kids and i am really glad the kids are so behave, they surely knew that mommy needs their help. I praised my son and he say's daddy ask me to behave while he's away, and it is amazing how 4 years old take responsibility although the matter of fact because i asked my husband if he really ask him to behave while he is away "he did not" but he did behave.

My kids is a big help for me during the days i worked with southernplate template, they just play beside me, watch their favorite program and just quite. I really feel accomplished and she love her new look...please pay her a visit because you will surely like everything in her site...food, lot of them and yummy and easy to prepare.

It's spring here in New Zealand and this past days i was enjoying the day because the cold air is slowly fading and is sunny and beautiful. Today, my son's kindy is celebrating their 100 years old birthday and i stayed in, help out the teachers and i really enjoy the time with the kids -- of course enjoying the sun at the same time. They have sack race, egg and spoon race etc..so will going outside the house now and will take advantage of the sunny day, who knows what is it going to be tomorrow because here in New Zealand you can get windy, rainy and sunny just in one day. so while it's sunny i would like to get out and enjoy it and spend my time with my kiddo. :)

10/11/08

Customize Blogger Comment System Continue's

8 comments Buzz Here
I have posted a few of how to customize you comment system because sometimes we bloggers did not take notice the comment section whereas it is one of the important part of blogging, we read comments, we leave comments and that's one of part where we can discuss things and even make your blog popular.
I would like to share you a recap of my post and i will also give a few links of where you can learn a few tricks.

Here are the list of my post about comment section, i hope you will learn from them and fine it useful.
This list will make your comment section better than before...to add a few more customization and soon you will have a wordpress or other professional like comment section here are the additional like to make it look more better.
  1. Randomness Toturials - Styling your comments Area, Numbering Comments
  2. Blogger Busters Tutorial - (Add Comment Avatar) Mybloglog Comment Avatar Hacks
I hope this list helps you learn of how to customize, tweak and make your comments section look more professional.

Using all of this tips and hacks, you can see the demo here in my blog... browse my comment section and you will see what i mean.

10/5/08

Cleaning Up my Entrecard Favorite

21 comments Buzz Here
I procrastinate a lot and i have this really old plan to clean up the list of my entrecard favorite which finally have done it -- i removed the ones that are no longer active and replaced my favorite blog that are active in the community because i am going to drop them everyday, i am using the entrecard toolbar now because i noticed that it making my dropping more faster .

I always started with my favorite then reciprocate what is in my inbox which i can't reciprocate to all of you guys but i always priorities the most popular then the rest, if you ask me why? because this are droppers who put an extra effort, please, please, please don't get me wrong with giving priority of dropping but it's my strategy but i am always open to listen to what your point of view guys.

I would like to thank you my top dropper for the month of September, another link love coming your way guys, this is one reason i use my favorite aswell because i want to be one of top dropper -- anyway here they are ad please pay them a visit aswell; they all have dropped 31 days here are TBN.


So, what is your dropping strategy? i wonder if you agree with me prioritizing my recipro dropping. I thought before that reciprocate everyone in my inbox is fine but i noticed that i passed the opportunity of getting free link from other site which very useful for my site...and so i started my favorite list.

10/1/08

List of Background for your Template

4 comments Buzz Here
Background added additional appeal to your template, the important you have in mind though is to have the right background; we can't just find an image and put them as background because it's colorful or you simply like the image but, instead choose a background that won't hurt the eyes of your readers because they can be destruction aswell.


I decided to post her a few resources of background images...they are my favorite either you like a textured background, colored or simply white it's all up to your just as long as it blend and won't scare your visitors.

Here are few resources of background that i like and you can have a look and even try them out.
  1. Barracuda Background - Woods which is very popular and used by some web designers, Papers, Fabric, Stones and more...explore the site and look which one you like the most.
  2. BgPatterns - Tiled Background - What i like with this is that you can choose the images, choose canvas so that it's not just plain, what color do you like, rotate the image if you like and you can also choose the location then apply the background so that you will get an idea of what it's going to look like in your template.
  3. Design Reviver - I love this site because not just cool background but you can get a lot of freebies to use for your project, even brushes, and fonts..have fun with this guys.
  4. bgmaker - Okay, if you like to design your own background this is for you, you can be as individual and unique as you can be.
  5. PixelDecor - Every Mama are going to love this site, i have a lot of favorite background here that are to funky, whimsy what else can you call them...i love the color combination and i love the patterns. Update: Please ask Jen of Pixel Decor to use them for private websites, and link to her site. They are *intended* for desktops.
  6. Squidfingers - Here's another source of lovely patterns 158 to choose from.
  7. tickie.net - Same as barracuda you get the stone, woods and a lot more -- more then the barracuda and you can even find food background, if your template or site is about food why not try to find your background here.
  8. fractured sanity - another great resouce.
  9. Miss Jo - Another one just like PixelDecor but you have to pay for this wonderful background though but it's worth visiting because the images are worth paying looks really great.
  10. Kaliber10000 - Patterns everywhere, tartan, pixel you choose.
  11. Dromoscopio - Beautiful dark patterns...really look good for your design.
There so many background resources you can find online, there's still have more i love just like urban dirty, and grunge texture -- the bottom line of background is to not to scare your visitors and won't blind your readers make it simple yet attractive.

I hope you can find something that you like in the list and find this list useful.

9/29/08

Removing the Firefox Dotted Links

5 comments Buzz Here
It is not a big deal really but it's good without the dotted lines. I am not sure if you have noticed it or not but i do.

When you click on the any links you may have notice a dotted outline, it appears around links when you click on any links this is the work of firefox. This is not creating any harm with your site though but if your a blogger like me i like it gone or dis-appear it looks better.

If you want them out aswell or want to stop the dotted outlines here's the simple thing to do. We just need to add outline:none to the a tag.

Go to your Dashboard then click Layout then Edit HTML place the code below:

a {
outline: none;
}
then save.

If your not sure where to place them, just click Ctrl+F then type a img then place the above code under it...please refer the image below for clarification.
you're done. It's simple, easy and bye-bye to that dotted outline.

9/28/08

My Friends Enjoy my DoFollow List

3 comments Buzz Here
I think time run so quick, the next time you know you need to make another post, i sometimes feel like i can't keep up with blogging anymore. If you're one of my followers and read most of my post you might noticed that some of my post are my old post -- my reason of doing that is that because i was using 3rd party comment system and lately i decided to make the most of blogspot to show the result of some hacks, tricks etc...another reason is that some of my visitors miss my other post, even though i have related post at the bottom of every post i think it still great to re-post them. I am not sure if some blogger have problem with that but in my own opinion their is nothing wrong with it.


Anyways, lets get to the business. Some bloggers already displays their list of users who follows their blog and i am one of them -- my followers get a follow link which is counted towards their page rank because i removed the nofollow tag. It's a great incentive to your followers isn't it.

HOW TO CHECK NOFOLLOW TAG?

Here's my instruction of how to easily check if the link is nofollow: Right click to any image of my "Blogging friends" then scroll down until you find the "PROPERTIES" click it and it will open to new window which called Element Properties if the link is nofollow you will see under the link properties relation: nofollow if the no follow is remove you won't see this tag.

I hope i did not confuse you, gush! i think i confused my self with my explanation. just let me know so i can elaborate more.

HOW TO REMOVE THE NO FOLLOW?

Easy, just follow this simple step and your done. Important: save your template before you start.

  1. Go to DASHBOARD - LAYOUT - EDIT HTML
  2. Tick Expand Widget Templates then hit ctrl+F type Followers1 or you can type rel='nofollow' (The dis-advantage of this is that you might have other nofollow that you don't want to remove instead of just the friends list) it depends of which your comfortable of doing.
  3. Then, look for this code rel='nofollow' and remove them
  4. Preview and if it loaded alright then save.
CHECK THE RESULT
It is great to check the result if the nofollow tag is being removed -- just follow the same explanation above about how to check nofollow tag and if you won't see the relation: nofollow anymore then your doing a great job.

Congratulation and inform your reader so that you will get more followers.

9/26/08

How to install Yahoo Buzz

5 comments Buzz Here
I just want to share of how to place the code in blogger, some have managed some have not heard them yet. Yahoo! Buzz is out for Entrecard user to use -- additional traffic to those who have great content. If you haven't read the Entrecard Blog: Attention Bloggers Yahoo Buzz has launched last 19th of August you can have a go and read everything about it and if you're ready to add them in your blog template this is how to do it.

Go to Yahoo! Buzz to choose the button click the "get code" and right click to copy and that's where we start.

This is the code i grabbed

<script type="text/javascript" src="http://d.yimg.com/ds/badge2.js" badgetype="small-votes">ARTICLEURL </script>

and all we have to do is replace the ARTICLEURL with this script <data:post.url/> so the my final code should be this below:


<script type="text/javascript"src="http://d.yimg.com/ds/badge2.js" badgetype="small-votes"> <data:post.url/> </script>


Where to Place them in Blogger?
If you want to place them at the top right corner of your post just copy the code below and follow the steps:

<div style='float:right; margin-left:10px;'>
<script badgetype='square' src='http://d.yimg.com/ds/badge2.js' type='text/javascript'>
<data:post.url/>
</script></div>

Copy the code above, then Go to Edit HTML then tick the Expand Widget and hit Ctrl+F and type Data:post.body then place the above code above the body of the post. as you can see i added style code in bold to place them at the right corner and it's margin.

This is what it's going to look like in your HTML:

<div style='float:right; margin-left:10px;'>
<script badgetype='square' src='http://d.yimg.com/ds/badge2.js' type='text/javascript'>
<data:post.url/>
</script></div>
<data:post.body/>

before you save your template, make a preview to see if their are problem with the code and to see the result if your happy with it -- then save.

If you want the alignment to be at the left corner of your post just change the blue from right to left and left to right.

To those who like the small buttons, the great place for them is at the footer therefore we need to look at the post footer.

Dashboard - Layout - Edit HTML then tick Expand Widget Template Ctrl+F then type <div class='post-footer'> then copy the code AFTER post-footer it will be look like below.

<div class='post-footer'><script type="text/javascript"
src="http://d.yimg.com/ds/badge2.js"
badgetype="small-votes">
<data:post.url/>
</script>
Preview it and if satisfied and happy save it.

I hope you find it easy to follow and you like the tutorial.

9/21/08

Highlight Authors Comment and Move the Comment Date

4 comments Buzz Here
If you're one of those who changed your comment code to highlight the authors comment, here's what to do so you can change your comment section and to make it look better.


This is sort of extension of my post on how to position the comment date above the comment body. I assume that you use the Blogger Buster Code to highlight your comment therefore the code is quite different from my previous post. I made a few changes of the code, i added some style and move the delete icon and also move the comment date at the right side.

Reminder: please save a copy of your template.

Take it easier, we will just replace the code with a new code.

  1. Go to your Dashboard - Layout - Edit Html
  2. Tick the Expand Widget Template
  3. Ctrl+F paste this code <b:loop values='data:post.comments' var='comment'>
  4. highlight this code below and replace them with new code:
<ul class='commentlist' style='margin: 0; padding: 0;'>
<b:loop values='data:post.comments' var='comment'>
<b:if cond='data:comment.author == data:post.author'>

<li class='author-comments' style='margin: 0 0 10px 0;'>
<b:if cond='data:post.dateHeader'>
<div class='commentcount'/>
</b:if>
<cite>
<b:if cond='data:comment.authorUrl'>
<a expr:href='data:comment.authorUrl'><data:comment.author/></a>
<b:else/>
<data:comment.author/>
</b:if>
</cite>
<br/>
<div style='clear: both;'/>
<b:include data='comment' name='commentDeleteIcon'/>
<p><data:comment.body/></p>
<div class='commentlink-date'><a class='commentlink' expr:href='"#comment-" + data:comment.id' title='comment permalink'>
<data:comment.timestamp/>
</a></div>

<div class='clear'/>

</li>


<b:else/>

<li class='general-comments' style='margin: 0 0 10px 0;'>
<b:if cond='data:post.dateHeader'>
<div class='commentcount'/>
</b:if>
<cite>
<b:if cond='data:comment.authorUrl'>
<a expr:href='data:comment.authorUrl'><data:comment.author/></a>
<b:else/>
<data:comment.author/>
</b:if>
</cite>
<br/>
<div style='clear: both;'/>
<b:include data='comment' name='commentDeleteIcon'/>
<p><data:comment.body/></p>
<div class='commentlink-date'><a class='commentlink' expr:href='"#comment-" + data:comment.id' title='comment permalink'>

<data:comment.timestamp/>
</a></div>
<div class='clear'/>
</li>

</b:if>
</b:loop>
</ul>


Then replace them with this code below, where i have added a few styles and moved the comment date at the top right side of the comment body:

Do you Know that you can change the word "said..." to say "commented..." all you have to do is look for the word said... that i put inside from the code below and change them with any word you want -- be creative! :D

<ul class='commentlist' style='margin: 0; padding: 0;'>
<b:loop values='data:post.comments' var='comment'>
<b:if cond='data:comment.author == data:post.author'>

<li class='author-comments' style='margin: 0 0 10px 0;'>
<b:if cond='data:post.dateHeader'>
<div class='commentcount'/>
</b:if>
<cite>
<b:if cond='data:comment.authorUrl'>
<a expr:href='data:comment.authorUrl'><data:comment.author/></a> said....<b:include data='comment' name='commentDeleteIcon'/><div class='commentlink-date' style='float:right; margin: -15px 0 0 0;'><a class='commentlink' expr:href='"#comment-" + data:comment.id' title='comment permalink'>
<data:comment.timestamp/>
</a></div>
<b:else/>
<data:comment.author/>
</b:if>
</cite>
<br/>
<div style='clear: both;'/>
<p><data:comment.body/></p>
<div class='clear'/>

</li>


<b:else/>
<li class='general-comments' style='margin: 0 0 10px 0;'>
<b:if cond='data:post.dateHeader'>
<div class='commentcount'/>
</b:if>
<cite>
<b:if cond='data:comment.authorUrl'>
<a expr:href='data:comment.authorUrl'><data:comment.author/></a> said....<b:include data='comment' name='commentDeleteIcon'/>
<b:else/>
<data:comment.author/>
</b:if>
</cite>
<br/>
<div style='clear: both;'/>
<div class='commentlink-date' style='float:right; margin: -15px 0 0 0;'><a class='commentlink' expr:href='"#comment-" + data:comment.id' title='comment permalink'>
<data:comment.timestamp/>
</a></div>
<p><data:comment.body/></p>
<div class='clear'/>
</li>

</b:if>
</b:loop>
</ul>


Then Save.

Look at your comments and you will now see the changes.

If you want to place the other comments into border and style them aswell just add this CSS code for the General Comment and your done.
.general-comments {
background: #BFE4FF;
border: 1px solid #333333;
padding: 5px;
}

I hope you find this helpful and enjoy!

9/20/08

Increase Your Traffic By Changing the Title Tags of your Blog

17 comments Buzz Here
You may have not noticed your title tag above, until you read this post -- but for some bloggers who knows SEO (Search Engine Optimization) they have tried to do different hacks just to enjoy the benefit of the Search Engine traffic.

Blogger came up a very simple hack and you can follow this easily. I found this hack from Amanda's and i would like to share it here.

Before This Hack:
Blog Title: Post Title (See photo below)

After this simple hack:
Post Title (Direct hit to your keywords)

Blogger Buzz posted their Updates and Bug Fixes for May 9th and this includes the simple fix of title tag.

Layouts now has a blog.pageName datum that gives the name of the current page without the “[Blog Name]: ” prefix that blog.pageTitle adds.

Most of us bloggers are no longer use the default template instead we use the third party template. I am using Amanda's Blue Steel Template from blogbuster.com and i am an avid fan of her, she works very hard of her blog and every blogger user can appreciate every post she made.

Anyways, just follow this very simple hack and your done.
  1. Go to your blogger Dashboard, click Layout, then Edit HTML
  2. Find this tag <title><data:blog.pageTitle/></title>
  3. Replace the whole tag with the following


    <b:if cond='data:blog.pageType == "index"'>
    <title><data:blog.title/></title>
    <b:else/>
    <title><data:blog.pageName/></title>
    </b:if>


  4. Save your template
Important: Make sure you replace the whole Title tag with the code given or else the word Title will show like i do when i first try this hack.

Once you've done this hack you can start seeing Only your Post Title, blog name removed.

This will increase the chance of capturing the search engine's attention, of course with proper use of keyword and you will benefit the extra traffic it brings to your site.

If hope your find this simple hack helpful and Enjoy!

Resources:
Bloggerbuster
Blogger Buzz

9/19/08

Why not use Gimp.

0 comments Buzz Here

I love header using landscape. I tried to make one using gimp. If you don't have photoshop the closer program that i can recommend is gimp...you can also use the brushes made from photoshop which it is so handy.


You can read my post about vector graphic, image manipulation tools and Gimp is that i recommend -- during that time i have not much knowledge of how powerful gimp until i decided to give a try read a lot of tutorials and i love it so much. Photoshop is so expensive and gimp is free so which one is great for practice? of course the free one until you are skilled enough and not satisfied then that is the time you use photoshop but at the moment i can't see the reason not to enjoy gimp instead.

Below is the sample of how great gimp is...if you notice the background image of my post title it is one of example of how great gimp is...here's my other sample.

Please let me know of what you think.


Here are tutorials to help you started with gimp:

I hope you like what you read and let me know if you want to use the image for your header and i will give you some link including psd to learn how i did it.

Download:
original image jpg

9/17/08

Fake Subscribers

10 comments Buzz Here
Subscriber count shows you have 1000 subscribers Wow! i like that -- but you only have one or two commenters what happen to your readers. I must admit that before, i joined Entrecard; I joined many social networking sites then i joined the groups exchange such as "i subscriber to your site, you subscribe to my site" You might ask me whats wrong with that? First, some other groups such us digg mine, i'll digg yours or technorati exchange and more is not much of a problem but what i find is the subscribers count.
As for me i would rather want to show the real count of my subscriber, If i only have 1 readers then that's fine because those are readers who really appreciate and wants to read my post. After a few months of joining Entrecard i get the chance to really visit sites, i learned to appreciate bloggers effort but i noticed some bloggers who shows their subscriber counts yet if you check their post not even single comment if not one or two...

I really admire those bloggers who are really honest, showing their feedburner subscribers count even it's zero and i even understand those bloggers who did not even shows the subscribers counts ... for me maybe because there is no reason to put them because theirs not much enough subscriber like my site or maybe they think that it is not enough count yet. Whatever the reason would be lets just leave it unless you want to share here by commenting.

In my own opinion which i am not sure if you agree (If not please leave your thought) that -- it is much more better to have the real count than looking ways to show fake subscriber counts just to impress visitors or readers because it is so obvious. Most of our visitors are like us (bloggers) and intelligent enough to notice and it drive them off away from your site. I visited one site before and it shows he have 1000+ subscribers shows in the feedburner count yet he only have one comment or none in every post so what does it says?

Please let me know what you think about this...i just want to share what i have noticed and what i think. If you dis-agree with what i say please leave a comment because i welcome corrections.

9/15/08

Resources Tools that you must have to optimize your blog

6 comments Buzz Here


This is my old post but i decided to re-post them because my brother ask me about SEO and i thought he already knew about this because he's been blogging for quite a while -- so, i hope this help you aswell. We value our blog so much we ask question on how to optimize, how to get link, how to get more visibility from search engine and follow some tips about search engine optimization. No matter what the purpose of our blog either personal blog, share our interest, or we want to earn easy money, we still need to go more deeper and understanding is the big part of blogging. We need to know the in and out of our own blog site.

I have here a must interactive tools that help you understand more the needs of your blog site, this tools don't provide you an optimization per se, but this will check on the results of your optimization efforts.

Marketleap - provides an integrated set of optimization check, this is free to use and you will be able to check the three below:
  1. Link Popularity - which checks the number of incoming links to your blog/site. As we know this is one of the major key to get higher page rank.
  2. Search Engine Saturation - simply refers to the number of pages a given search engine has in its index for your website domain. This show you a graph pf how much is your search engine saturation...mostly can be used for search engine marketing campaigns.
  3. Keyword Verification - You can verify your site placement with the top search engines and directories, It's important to be in the top 3 pages of a search result because most people using search engines don't go past the 3rd page.....Make sure to use the keyword for checking is something you want to be found for (One of the keyword you put on your meta tag example: make money, earn easy money etc....).
Link Popularity Checker - This is an alternative to the marketleap. It going to show you the 5 search engines which is Google, MSN, AllTheWeb, Altavista and Teoma (Instead of Hotbot -- compare to the market leap).

Other resources which you can use to learn about optimization are forums to where the webmasters hang out and helping each other, tackle some issues and which much more focused on SEO and give more information. Sites where you can get more tips and read an articles where can help you learn more about optimization.

Webmasterworld and SearchEngineWorld- News and discussion and articles.
SEOConsultants - You will find various information about SEO including tips and tricks, Tutorials.

Understanding SEO is much more better than know nothing at all. When we blog we "DIY" our blog especially when we just start learning about blogging until the time that you are making enough money to pay for consultancy and professionals to Optimize you blog this resources are great tool to understand more and work more to get the high page rank and increase your site visibility.

I hope this help you in many way ... it does for me, i now know what particular keyword really put me at the first page of the SERP (Search Engine Result Page) when i use "make money" it did not put me in the search result but when i used the earn easy money this brings me at the first page of top 4 search engine results. Now i need to work on the other part of my optimization such as page saturation.


9/13/08

Long Post or Short Post?

12 comments Buzz Here
Short post or long post?. If you ask me i read a short post, especially when it's straight forward and direct to the point. I am not sure if most of bloggers are like me -- but while dropping Entrecard i read post as quick as possible and i read the first paragraph and the end of the post, i usually don't read the middle of the post unless i am very interested with the post and i have seen a lot of bloggers who knows how to write good short content (Keep It Short and Simple) and one thing aswell, When i see a long post, my mind automatically choose not to read the post unless the title of the post gets my attention.
Now, i would like to ask you:
  • Do you like to read a long post or do you like to read a short post?
  • What do you think of long post?
I don't know which one is advisable to write though, a long post or short post. For me i think keep it short and simple but meaty, say what you need to say -- no stop over, no useless paragraph (K.I.S.S is always effective) because every blogger who visited you site are busy bee and don't have the time to read a long post.

This is just my own opinion, :) i don't know about you? let me know.

You can read my other post:

9/4/08

Please Let Me Know!

1 Comment Buzz Here


The header auction did not go as i expected and i found that this is the dis-advantage because i can't tell of who are serious bidders and not...anyway, i still have the header and up for grab, of course Amanda gets the first offer but if not interested will be for anybody who are interested... I will change the header to go with your template. Despite of everything though, i still will carry on with my coming auction (3 column Template) I am open to any suggestion to make my auction available to only serious bloggers.


Today, i changed my template, i am back to bloggers comment system, i have nothing against intense debate still my favorite comment system but i want to use the full potential of blogspot since i am blogging about bloggers tips and tricks so might aswell use the whole system.

I am thinking of white post background but i will definitely will change my header, and the footer.

Please let me know if you find problem with my template while dropping and reading.

Last thing: I will be having a clean up with my links to replace with new ones. Please let me know if your interested of exchange links and wanted to be added to my list.

Update: This Header Auction is already Taken by Amanda...She is very interested in it...Thank you very much Amanda. It's a smooth transaction and she is very professional to deal with. Please wait for my next auction it's a Whole Template.

9/2/08

Color and Your Personality

4 comments Buzz Here
I stumble this site today called color in motion and it's really cool. I found out the personalities of Purple which is obviously the color of my site, Purple's personality describes as follows:
  • Purple Personalities have sensitive eyes and mind.
  • You are proud of being artistic and enjoying art.
  • You have good mind and wit.
  • You have the ability to observe things which go unnoticed by others.
  • You are aloof, temperamental, introspective and refined.
  • Friends believe you are clever and capable of great things.
  • You are easy to live with.
  • You are specially polite but sarcastic at times.
  • You like to be admired and welcome compliments.
  • Purple personalities are conventional and tolerant.
  • You may be inclined to let the problem rest as they are.
  • Enjoy being extravagant every once in a while.
Isn't it great? and i can say that with what the personalities describe above shows some of my personalities and who i am -- moody and love art, easy to live with (I should ask my hubby about this easy to live with if it is true hehehe!), polite but sarcastic (I think that being sarcastic i learned from my hubby -- thank you honey! ) and more....

What about you? what color do you like? please let me know if it describe your own personalities aswell.


  © Blogger template 'tbn' by thebuzznutter 2008

Bring me to TOP