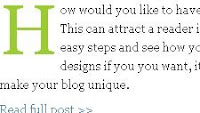
Subscribe Here RSS or Email

5/26/08

Want to put a Post Divider on your Site?

0 comments Buzz Here
I was working with my very first Blog Template, and last night i was looking of how to change the post divider from dotted border to image. Finally i found out on how to and where to place my code. I like the result and i love the look -- it make your site looks great as well.

Why do we need to put an image instead of just border?
I have noticed that some of Mommy's template are very well done and looks great and i helps me stay longer especially when the content is very interesting that makes me read not just what i see but i navigate and reading more. The post divider is nothing intrusive or not a problem at all but i was thinking not just to make your site look great but it captures attention to your other post as well.
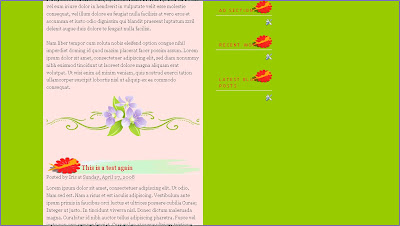
Here's my simple hack and i hope you it works for you too!
  1. Go to your Dashboard then click Layout
  2. Click Edit HTML...(Important! Save you template)
  3. Control + F then type .post-footer {
  4. Then we are going to add this code below
    background:url("YOUR IMAGE URL");
    background-repeat:no-repeat;
    background-position:50% 50%;
    height:100px;
  5. Before you save, preview first and when your happy then Save your template and your done!
The pictures where i captured my photo's is from the template i am working. Soon it will be available here in my site.
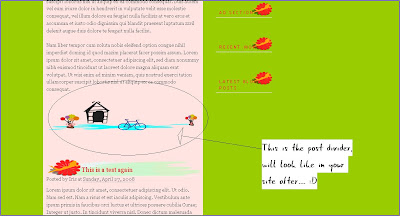
Above is the only one divider i made and it's free for you to use (I will try to make few divider when i get the chance) you can right click and save the image or copy link location

Here is how it going to look like in your site.
I hope you like this hack and find it useful. As for me i like it and you will see the demo here in the test template that i am working at the moment.

5/16/08

Tweak you blogcatalog widget

0 comments Buzz Here


Ori one of the blogger sent me an email the other day asking if i can explain on how i tweaked my blog catalog widget. Although i know there are bloggers that are already know how to do this but i decided to share it here in my blog aswell. For those bloggers that are not really that confident yet or have not tried tweaking their template or widget can follow this easy step.

This is what we want it look like:


I replied to Ori and gave her the instructions already. I will share it here aswell. It's easy to follow steps and you will be surprise why you didn't think of this.

You already have your blog catalog widget code in your site now all you have to do is to edit them a little bit and you have cool widget.

Here's the easy steps:

  1. Open your bloggers Dashboard
  2. Click Page Element then click edit from your blog catalog HTML/Javascript
  3. Then look for: Width, row, bgcolor (Background Color), bcolor (Border Color).
  • width - Set them as same width of your sidebar where you want your widget to be placed. With my sidebar width is 260 so i set it to "width=260"
  • rows=2 - I only want to have two row, but if you want more just replace to how many rows you like.
  • bgcolor=FFFFFF - You need to set the background color same as your sidebar color
  • bcolor=FFFFFF - Same as your border.

Note: For your border and background color if your not sure what color it is you can check them by going to your Template Code by clicking "Edit HTML" then ctrl+F type sidebar and you will find it there.

above are the only one's that i changed but if you want to change their link colors and header you can look for lcolor=333333&hcolor=FFFFFF and change the hex color code that you want....but if that's all you want to change then just leave it as is.

I have here the complete code for Recent Viewer ready for you, all you have to do is change marked blue

<script src="http://www.blogcatalog.com/w/recent.php?id=YOURUSER IDNUMBER&width=SidebarWidth&rows=2&bgcolor=FFFFFF&bcolor=FFFFFF&lcolor=333333&hcolor=FFFFFF&htext=RecentViewers&name=1&img=l" type="text/javascript"></script>
</p>

I hope you like this easy tutorial. It does makes your widget look better and not over populate your site -- Sometimes readers don't like to see a sidebar that have so much going on, it's a bet of a turn off for them.

5/9/08

Ditch your old comment system, replace them with Intense Debate

1 Comment Buzz Here
Most of the bloggers are are using Blogspot.com that for obvious reason it's easy and user friendly but one that i really don't like is the comment system. Today, i was about to comment on one of the blog, i click comment then the pop up comes as expected but it's very slim it only shows the half of the window (I don't know if that's my computer or what) and i cannot see the capatcha to finish my comment and i left without posting my comment, It's frustrating and i am not happy.


I have tried many comment system because i want to have a better comment system for my blog and for my readers which i valued the most, i want to create a discussion type where i don't need to say @carol (that's to address my respond to carol or @dave) and that is not what i like for my comment system, i don't want it to stay that way and i am not going to wait for Google to do something about it because i don't know if they will. I have read a lot of blogger that are complaining about the comment system and it's truly is frustrating including the hard to read capatcha that turn off your commenter's. Today, i would like to share my new comment system - Intense Debate, i am happy using it because it looks great, it's easy to integrate and i can reply to the comments or questions who need my response individually and have a discussion which is really great.

What is Intense Debate?
It is a replacement to your standard blog comment system, intense debate is packed with complete new tools to spice up the conversation.

What are the Feature of Intense Debate?

  1. Comments Tracking and Notification - Friends comments and your post comments sent to your email to notify you that one of your post have comments need moderation or even if someone replies to your last reply and so that the conversation can continue.
  2. Structure - This is what i like, i can reply to the individuals -- the comments are threaded and can easily follow the conversation.
  3. Profiles - You can upload your own avatar so that everything you make a comment it shows your brand. Your profile have the list of your friends, your social networking sites.
  4. Reputation.Comment Voting - Every Identity have it's own reputation attached. You can rate the comment of your commentators and shows some value of their comment.
  5. Social Traffic Drive - Intense Debate link you to your social networks sites, expose you more and connects to you completely
  6. Widget - you can place the cool widget to you site to show your number of comments, latest comments, top 10 commenter's and more.

My Experience with Intense Debate:
To be honest, after i integrate intense debate to both of my blog my other site, clickdtalk went really smooth i never have any problem opposite with this blog thebuzznutter. The comment counts is not showing, it remains zero even though i have say 3 comments anyway, after a few emailing back and forth it was resolved and now it's running smoothly and i have a really great comment system.

If you think that it's time for you to move on and take your comment system to the next level try intense debate. I remember when i left a comment to LisaC of how frustrated i am at that moment with intense debate (I am so impatient! that's what it is) and see respond that Intense Debate is like "Love and Hate relationship" and it's true i hated it at first and now i love it.

If you want to know more and want some help to decide about integrating intense debate to your site, read the FAQ and watch the video; When your ready, just place your url, follow the instruction and you're ready to ditch your old comment system.

5/5/08

Make the first letter of your paragraph larger the easy way

0 comments Buzz Here
I have tried the drop cap using Microsoft Format Menu but get tired of cut and paste, i find it more work and their are times it didn't work. I have tried the other methods and have the same situation, frustration and i end up editing my post because the letter just don't follow to what i want.

Dropcap will actually add attraction to your content.

What is Dropcap?
A larger letter at the beginning of your paragraph...larger than the rest of the letters.

I search about this and there many ways to use dropcap, but i will just share the simple and easy way to have this in your blog.

What do you need?
You need is to follow the simple instruction and your done. You need to have an access to your html template because we are going to use CSS (Cascading Style Sheet) -- This is where you command and instruct your text on how they will appear on the web page.

Here's what to do, follow this easy steps.
  1. Go to your Dashboard, open Layout and then edit HTML
  2. MUST: Before editing your template, make sure you save a copy of your template. Make sure you click Download Full template.
  3. Look for this </b:skin>
  4. Place the below code before </b:skin>
.dropcap {
float: left;
font: normal 60pt/0.8em Georgia,
Helvetica, Verdana, Arial,
sans-serif;
color: yellowgreen;
margin-right: 3px;
}
Then Save your template.

Note: For the beginners or the one's that are not so familiar with CSS, it maybe hard for you to find the Step 3, to make this easy hit Ctrl+F then type </b:skin>

If you want to change the color of the first letter to match to your template, you can. Just replace the one i colored green using with any color you like or if you want to use the hex color code just replace the above code with below code and replace the #F5F5F5 with color of your choice from the color code chart.
color: #F5F5F5;
Just do whatever you like with the color, experiment and have fun.

After you have placed the style of your dropcap, we need to save an html to your post template -- follow this next steps.
  1. Go to Settings
  2. look for the formatting menu
  3. Scroll down until you find Post Template
  4. Copy the below code
<p>
<span class="dropcap">T</span>his starts with a dropcap.
</p>

Save Setting.

Make a new post and see how you like it.

There are other bloggers that i have seen using different approach, they used different font, they make it look fancy.

For more dropcaps try this:
mandarin design
Learning jquery
tjkdesign
fancy dropcaps

Look for the fancy Initials? You can download it from dafont.

I hope you followed my instructions and enjoyed it as much as i do. Please check my other tips and tricks and start tweaking and make your site look attractive.

If your new here please don't forget to subscribe to my RSS or by email. Please come back for more tips and tricks.


5/1/08

How to make the first letter of your post larger using Microsoft Word Format Menu

0 comments Buzz Here


Have you noticed that the first letter in my paragraph is big? Of course who can, what a silly question (Actually, i just don't know how to start my paragraph) . This is called Dropcap, it's a magazine style and i really love it - That added attraction to my content and i suggest to use this in your post.

I have tried different approach, I would like to show that you can possibly do this using Microsoft Word, Here's How:

  • Create your post using Microsoft Word
  • Highlight the very first letter of your paragraph
  • At the top of your Microsoft Windows look for the format menu
  • then click Drop cap from there you can choose if you want dropped or In margin
  • Decide also of how many lines of letter you want to drop, and you can control the distance from the text (0.01 to 0.02) works well for me, depend with the kind of font you are using aswell.
And here's the result Here's my setting for this (Lines to drop = 3, Distance from text = 0)

T

his is a sample using Microsoft dropcap. It’s easy and no CSS or any styling necessary. Since many blogger do not want to miss around their html or no familiar with the html.


I have here another sample: (Lines to drop = 3, Distance from text = 0.02) I changed the text aswell to let the letter to stand out.

T

his is a sample using Microsoft dropcap. It’s easy and no CSS or any styling necessary. Since many blogger do not want to miss around their html or no familiar with the html.


Please experiment with the font. If you notice, i only change the first letter font but you can also change the whole paragraph, do whatever you do -- It more like it's what you see, is what you get.

I hope you find this tutorial useful. And please do check my other tips and tricks.
 

  © Blogger template 'tbn' by thebuzznutter 2008

Bring me to TOP